> For the complete documentation index, see [llms.txt](https://docs.roomle.com/rubens/llms.txt). Markdown versions of documentation pages are available by appending `.md` to page URLs; this page is available as [Markdown](https://docs.roomle.com/rubens/rubens-products/rubens-room-designer/customisation/custom-overlay.md).
# Add custom overlays (advanced)
To add a custom view you have two options. Either you embed it into our UI which means we add an iframe into our page, or you overlay our UI with your own one. Both options have their reason to exist. The embedding into our UI involves less setup and in contrast the overlay gives you more control but needs more steps to be implemented. Currently, this only works nicely for desktop. We are working hard to improve the mobile experience soon.
Let's start with the overlay solution first
## Add custom view as overlay
Assume the following scenario:
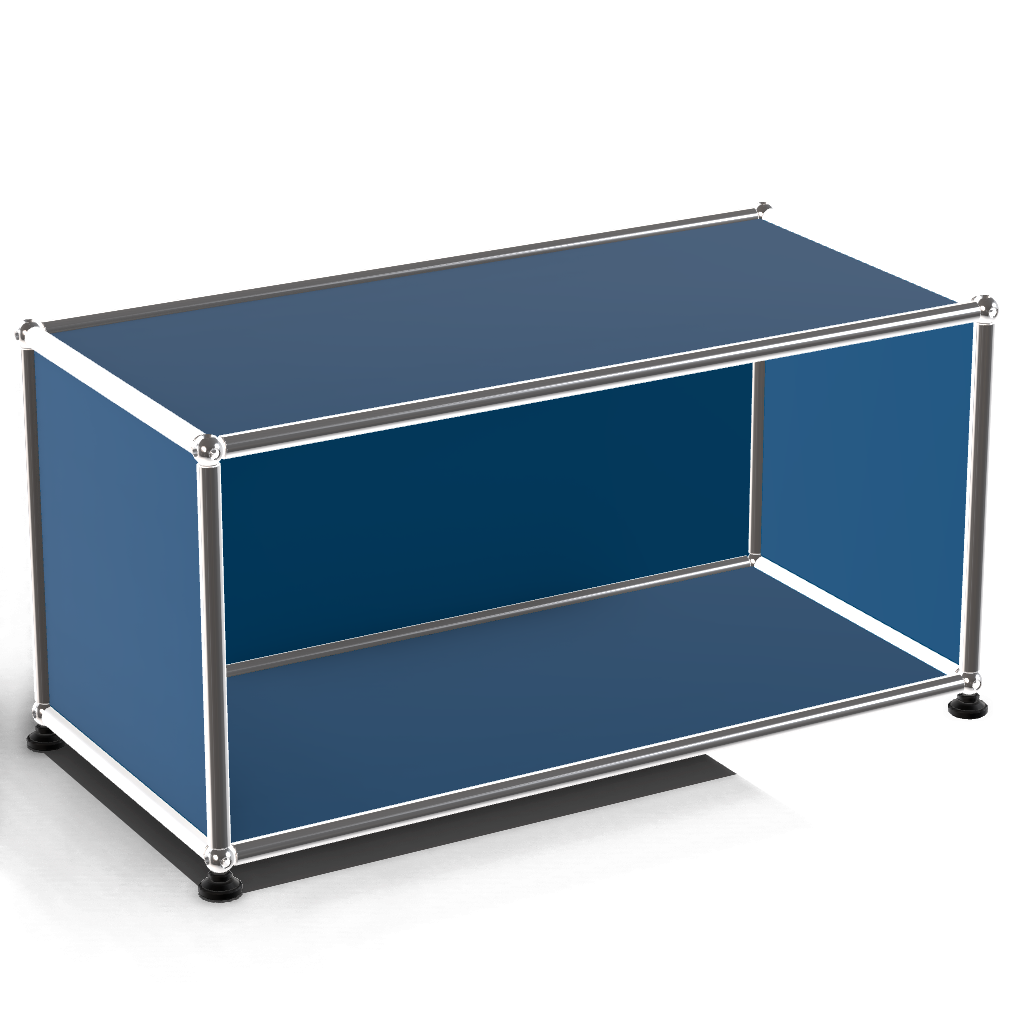
You have a Room Designer scene, and you want to show a custom view whenever a user selects a specific item, e.g.: USM Frame. Since we build an overlay this requires that you embed the Roomle UI somewhere on your webpage with our [embedding lib](https://www.npmjs.com/package/@roomle/embedding-lib).
In our example, we want the custom view to always overlay the drawer on the right-hand side. Additionally, the custom overlay should also animate in and out in the same way as the drawer does.
And last but not least, we want the user to be able to drag-in items from the overlay. As always you find the whole example in our [CodeSandboxes](https://codesandbox.io/p/sandbox/custom-overlay-2ksdqn). Be aware that this is not a copy & paste tutorial, we rather show the important parts of the code. If you want a copy & paste solution checkout our [CodeSandbox](https://codesandbox.io/p/sandbox/custom-overlay-2ksdqn). Nevertheless, we think it makes sense to go through this tutorial because there are some small gotchas you can easily overlook when simply copying and pasting. But now let's get started.
### Basic setup
At first, we prepare the HTML of our webpage:
```html
USM Selected
USM is a very beautiful shelf system therefore it has it's own selection
page
Drag in more of the nice stuff
To toggle the drawer click me
```
It is also important to take a look at the CSS to fully understand what's going on:
```css
.custom-overlay {
position: absolute;
background-color: white;
z-index: 999;
border-left: 1px solid #e7e7e7;
padding: 1rem;
box-sizing: border-box;
}
.hidden {
/**
* in our example we show/hide based on opacity
* this makes it easier for us to apply animations
*/
opacity: 0;
pointer-events: none;
}
#configurator {
width: 100%;
height: 100%;
box-sizing: border-box;
position: relative;
top: 0;
left: 0;
/**
* IMPORTANT: it is very important that the container
* of the Roomle iframe has it's own CSS stacking context
* otherwise we can not infer the drag-in position correctly.
* In our example the easiest way to create a stacking
* context is by applying a CSS transform to the container
*/
transform: translate3d(0, 0, 0);
}
.ext-overlay-container {
position: relative;
width: 100%;
height: 100%;
overflow: hidden;
}
```
Now after we have the DOM setup we need to create an instance of the Rubens Room Designer. We do it like this:
```javascript
const instance = await RubensEmbedding.createPlanner(
'demoRoomDesigner',
document.getElementById('configurator'),
{
autoStart: true,
moc: true,
startInDetail: false,
customView: {
itemSelection: {
overlay: true,
options: {},
},
},
},
);
await instance.ui.loadObject('ps_lzu8f1101goct3a300r7evf0cw7n1zm');
```
We need special attention for the section at `customView`. This is a JavaScript object that consists of the name of the `customView` we want to set as key and the options of the `customView`. In our case we just set `overlay` to `true` to indicate the Rubens Room Designer that instead of the regular view during item selection we show a custom overlay.
So far so clear (especially when you already have a Roomle Rubens embedding setup). To make our overlay interactive we need to glue some code together. First we implement a logic to show and hide it. Therefore, we add the following code before `loadObject`:
```javascript
instance.ui.callbacks.onShowCustomView = async (viewName, args) => {
console.log('onShowCustomView', viewName, args);
if (viewName === 'itemSelection') {
// some code...
return true; // return true if we show the overlay
}
return false; // return false if we do not show the overlay and the default Roomle UI should be shown
};
instance.ui.callbacks.onHideCustomView = async (viewName, args) => {
console.log('onHideCustomView', viewName, args);
if (viewName === 'itemSelection') {
// some code...
}
return true;
};
```
The callbacks `onShowCustomView` and `onHideCustomView` can be used to react to changes in the UI. It is important to mention, that the `onShowCustomView` should return a boolean to indicate the Roomle UI if an overlay is shown or not. Return `true` if you show the overlay and `false` if not.
Two other callbacks are interesting as well `onExpandDrawer` and `onCollapseDrawer`, those callbacks trigger when the Roomle UI initiates a change of the state of the drawer. Collapse means that the drawer should slide out of the screen and expand indicates that the drawer moves in. Therefore, we listen to those callbacks as well:
```javascript
instance.ui.callbacks.onExpandDrawer = async () => {
// some code
};
instance.ui.callbacks.onCollapseDrawer = async () => {
// some code
};
```
It is important to mention that collapse and expand are animated in the Roomle UI. To mimic this animation you can utilize the method `ui.getDrawerAnimation();`, which returns `{transition: CSSDeclaration of the transition, direction: 'horizontal' | 'vertical' /* vertical is used on mobile */ }`. The `transition` gives you the exact CSS string we use to animate the drawer. This can be applied later in our full example as well.
Now let's get back to `onShowCustomView` and `onHideCustomView`. We didn't discuss how to position the overlay exactly over our drawer. Therefore, we can use `ui.getDrawerBoundingClientRect();`, this returns an object with the shape: `{final: DOMRect, actual: DOMRect}`. The reason why we use `final` and `actual` is the animation we discussed above. `actual` represents the current position and `final` the position after the animation. This is important in cases where the drawer is collapsed, and an action expands the drawer and simultaneously opens a custom view. If the drawer is not collapsed `actual` and `final` have the same values. Now let's use the results of `ui.getDrawerBoundingClientRect();`:
```javascript
const getOverlayDomElement = () => document.querySelector('.custom-overlay');
const positionOverlay = async () => {
const { final: clientRect } = await instance.ui.getDrawerBoundingClientRect();
const element = getOverlayDomElement();
element.style.width = `${clientRect.width}px`;
element.style.height = `${clientRect.height}px`;
element.style.top = `${clientRect.top}px`;
element.style.left = `${clientRect.left}px`;
element.style.transform = '';
};
const showOverlay = () => {
const element = getOverlayDomElement();
element.classList.remove('hidden');
};
instance.ui.callbacks.onShowCustomView = async (viewName, args) => {
console.log('onShowCustomView', viewName, args);
if (viewName === 'itemSelection') {
await positionOverlay();
showOverlay();
return true;
}
return false;
};
```
To hide the custom view we do the following:
```javascript
const hideOverlay = () => {
const element = getOverlayDomElement();
element.classList.add('hidden');
};
instance.ui.callbacks.onHideCustomView = async (viewName, args) => {
console.log('onHideCustomView', viewName, args);
if (viewName === 'itemSelection') {
hideOverlay();
}
};
```
The next thing we need to take care of are the `onExpandDrawer` and `onCollapseDrawer` callbacks:
```javascript
instance.ui.callbacks.onExpandDrawer = () => {
const overlay = getOverlayDomElement();
overlay.style.transform = '';
console.log('onExpandDrawer');
};
instance.ui.callbacks.onCollapseDrawer = async () => {
console.log('onCollapseDrawer');
const style = await instance.ui.getDrawerAnimation();
const overlay = getOverlayDomElement();
overlay.style.transition = style.transition;
overlay.style.transform = 'translate3d(100%, 0, 0)';
};
```
Now we should have all the things in place that we show/hide the custom view accordingly. One thing we also should consider is `window resize event`. We can take care of that the following way:
```javascript
// positionOverlay is the same as above
window.addEventListener('resize', positionOverlay);
```
### Conditionally show the overlay
Since we have the basic setup in place we can take a look how we could implement the requirement that we only want to show the custom view if an USM Frame item is selected. Here is some code to illustrate the idea:
```javascript
// same as Promise.withResolvers
// https://caniuse.com/mdn-javascript_builtins_promise_withresolvers
const promiseWithResolvers = () => {
let resolve;
let reject;
const promise = new Promise((res, rej) => {
resolve = res;
reject = rej;
});
return { promise, resolve, reject };
};
const state = {
currentSelection: null,
};
let selectionPromise;
instance.extended.callbacks.onSelectionChange = async (
_selectionMode,
_objectType,
payload,
) => {
const { resolve, promise } = promiseWithResolvers();
selectionPromise = promise;
const objects = await instance.extended.getObjects();
if (!objects || !objects.length) {
state.currentSelection = null;
return;
}
const object = objects.find(
({ configurationRuntimeId }) =>
configurationRuntimeId === payload.configurationRuntimeId,
);
if (!object) {
state.currentSelection = null;
return;
}
state.currentSelection = object.data?.rootComponentId || null;
resolve();
};
instance.ui.callbacks.onShowCustomView = async (viewName, args) => {
console.log('onShowCustomView', viewName, args);
if (viewName === 'itemSelection') {
await selectionPromise;
if (!state.currentSelection) {
instance.ui.callbacks.onHideCustomView(viewName, void 0);
return false; // do not know if or what is selected
}
if (state.currentSelection === 'usm:frame') {
await positionOverlay();
showOverlay();
return true;
} else {
instance.ui.callbacks.onHideCustomView(viewName, void 0);
return false;
}
}
instance.ui.callbacks.onHideCustomView(viewName, void 0);
return false;
};
```
The whole idea with the `selectionPromise` stems from the fact that the communication between your webpage and Roomle UI is asynchronous and therefore the order of the calls cannot be guaranteed forever. An `async` here or an `await` there could easily change the order and to make it stable and robust we recommend to wait for the callbacks before doing stuff.
#### Add drag-in
There is a whole tutorial about the drag-in, so we will cover only the essentials we need for our use case here. Before we start coding take one step back and have a look at the HTML and CSS, specifically:
```html
```
We hand over the `div#configurator` to the embedding lib to add the Roomle Rubens UI. The UI is integrated as an iframe. And since your webpage does not run on the roomle.com domain the cross site policy takes effect. Therefore, the communication between the iframe and your webpage is done over `postMessage` and is stringified (aka serialized). This means that we cannot send native events like the `DragEvent` between those two pages. To work around this limitation the embedding lib intercepts the current information of the `DragEvent` on your webpage and forwards the necessary information to Roomle Rubens UI. To make this work we have to put a transparent overlay above the Roomle Rubens UI. This makes it possible that we detect the current mouse cursor position and forward it to the Roomle Rubens UI. To make this work correctly we need to assure two things:
* the `div#configurator` has to use CSS `position: relative` or `position: absolute`
* the `div#configurator` has to create its own CSS stacking context, otherwise we would not know what z-index the transparent overlay should get
After we made sure that those two things are set up correctly we can start thinking about the code. First, we need to tell the embedding lib that it should load the `DragIn-Plugin`:
```javascript
const instance = await RubensEmbedding.createPlanner(
'demoRoomDesigner',
document.getElementById('configurator'),
{
autoStart: true,
moc: true,
startInDetail: false,
customView: {
itemSelection: {
overlay: true,
options: {},
},
},
},
['dragIn'],
);
```
After that we need to attach the drag-event listeners to our elements, we do this like the following:
```javascript
const attachDragListeners = (el, instance) => {
if (!instance.plugins.dragIn) {
console.error('DragIn plugin not available');
return;
}
el.addEventListener('dragstart', (event) => {
const id = event.target.getAttribute('data-rml-id');
if (!id) {
console.error('No id found, please make sure that [data-rml-id] is set');
return;
}
instance.plugins.dragIn.dragStart(id, event);
});
el.addEventListener('dragend', () => {
if (instance.plugins.dragIn.isDragging) {
instance.plugins.dragIn.dragEnd();
}
});
el.addEventListener('drag', (event) => {
instance.plugins.dragIn.dragUpdate(event);
});
el.addEventListener('touchstart', (event) => {
const id = event.target.getAttribute('data-rml-id');
if (!id) {
console.error('No id found, please make sure that [data-rml-id] is set');
return;
}
instance.plugins.dragIn.touchStart(id, event);
});
el.addEventListener('touchend', () => {
instance.plugins.dragIn.touchEnd();
});
el.addEventListener('touchmove', (event) => {
instance.plugins.dragIn.touchMove(event);
});
};
document.querySelectorAll('.catalog img').forEach((usmToDrag) => {
attachDragListeners(usmToDrag, instance);
});
```
Concerning the drag-in there is now still one challenge left which is the `DragGhost`. The `DragGhost` is the small little image that is shown by the browser when a drag is started and ongoing. Since it is very hard to control the `DragGhost` consistently across all browsers, and since we have special requirements (like hiding the `DragGhost` while dragging) we have to remove the default `DragGhost` and draw our own `DragGhost`. Since the Roomle embedding lib does not know where you want to show a `DragGhost` and where not we provide you with a hook that can tell the embedding lib when to show the `DragGhost` and when the 3D scene of Roomle Rubens UI should take over. You could do this in the following way:
```javascript
instance.plugins.dragIn.beforeUpdateGhost((x, y) => {
const element = getOverlayDomElement();
const bb = element.getBoundingClientRect();
return {
x, // You could alter the X position of the current drag (in case you are on mobile and want that the finger does not hide the dragged element)
y, // same as above with X. You can alter the Y position of the current drag
options: {
ghost: {
// visibleIn defines the box in which the DragGhost should be visible
// outside of this box the 3D scene takes over. DragIn options like dragInOverlapY and dragInOverlapX
// are added to the box
visibleIn: {
x: bb.x,
y: bb.y,
height: bb.height,
width: bb.width,
},
},
},
};
});
```
Now everything for drag-in should be in place. Finally, have a look at some small tweaks.
#### Miscellaneous
Additionally, to the previous created requirements we want to add two more things:
* a close button
* a toggle for the drawer
Be aware that the feature of custom views is still at a very early stage and probably some APIs will become better and more mature in the future. But let's have a look what's currently possible.
To implement a close button we need to know when the item selection is canceled. This happens when there is no item selection anymore. Therefore, we can simply do:
```javascript
document.querySelector('.close').addEventListener('click', () => {
instance.extended.cancelSelection();
});
```
And to programmatically toggle the drawer we can do:
```javascript
document.querySelector('.toggle').addEventListener('click', () => {
instance.ui.toggleDrawer();
});
```
***
## Add custom view integrated
Now after creating a custom view as overlay we explore the other option, to integrate the custom view as an iframe inside our user interface. To see another use case we will create an external catalog that can be integrated as an iframe.
Again we won't create copy & paste code here but rather have a look at the important parts of the code. The full code to copy & paste can be found again in the [CodeSandbox](https://codesandbox.io/p/sandbox/custom-view-integrated-4rrthq?file=%2Findex.html%3A21%2C20\&workspaceId=0aad72d6-694c-415e-807c-961ed7912bf7).
At first, we need to alter the initial embedding code slightly:
```javascript
const instance = await RubensEmbedding.createPlanner(
'demoRoomDesigner',
document.getElementById('configurator'),
{
autoStart: true,
moc: true,
startInDetail: false,
customView: {
extCatalog: {
url: window.location.href + '/catalog.html',
options: {
showHeader: false,
},
},
},
},
);
```
The setting for `customView.extCatalog.url` indicates that the custom view is behind a URL and needs to be integrated as an iframe. It's important to mention that the URL currently has to be an absolute URL starting with https.
Then we need to create a separate HTML page that should be integrated. We do the following:
```html
Drag Me
```
It is important to mention that we need to use `data-rml-draggable="true"` instead of the native `draggable="true"` HTML5 attribute. This is due to restrictions of the cross site policy. If the domains of the Roomle Rubens UI and your webpage are different, then cross site policy takes effect. This means that native drag events can not really be share between those pages. Also, it is almost impossible to track the mouse position from inside the custom view and forward it to the Roomle Rubens UI. To work around that we implemented a solution that mimics native drag events and send them to Roomle Rubens UI.
Now let's have a look what we need to do inside `